Support
Forum
Tips / Tricks / Bugs / Help / Users community shares their experiences.
> Go to the users forum
FAQ
No, you can find Mac OSX & Pc Windows versions on the homepage.
Activation is really easy ! You have to activate the software to be able to save and to use all presets.
1. Launch BAZIK
2. Open the Options panel and enter your license key (receipt by e-mail).
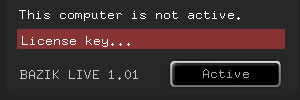
3. Click Active. If you’re license key is available, the field become green and you are activated.
Imagine Bazik as a hardware machine. If you need to save different setups, create a clone. You can use several clones simultaneously.
Go to the options panel and select the display you want under “Select output resolution”.
When your show is run you need to be part of it, not buried in your computer. Bazik has been created for easy live performances. If you don’t have time to play with it, automation can help you to sync with music effortlessly. Each user can choose the level of interactivity he won’t.
Bazik can work automatically with his powerful engine which analyzes the music to create variations alone.
Click the top left buttons to choose which action must be automated.
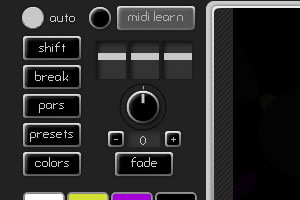
There are 2 levels from automation. Click the circle next to “auto” for choose the level “Soft” or “Normal”. Observe the speed of blinking which changes according to the level.
The “Soft” level will make variations softer and the changes will be less frequent than in “Normal” mode. Try to understand !
You can adjust the input level with the upper left equalizer.
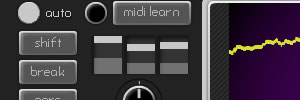
You can adjust Bass/Mid/Treble to obtain the render you wish. These adjustments are taken into account for automations.
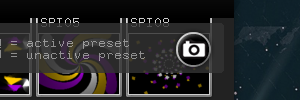
When your application is activated, you can manage your presets in the Presets panel.
You drag and drop any thumbnail to reorganize the list.

You can Active or Unactive each preset. Roll over with key W to unactive. Roll over with key Q to active.
The inactive preset seems dark.
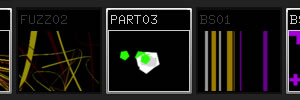
You can use top buttons to sort list.
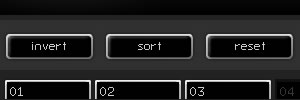
invert : Invert Active presets and Unactive presets
sort : Sort the list by putting at first every Active presets
reset : Reset the list in the order by default (no Active/Unactive consequence)
You can create a new thumbnail for the selected preset by hit Snapshot button.
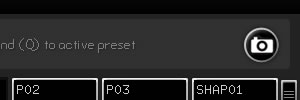
Snapshot gets output render to create a thumbnail. This permanently create a new thumbnail. Be careful, you cannot cancel !
This is very useful when you add external preset.
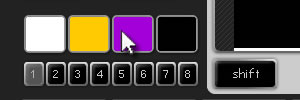
You have 8 banks of 4 colors available.
Click on the 4 squares of overview to open/close the color manager.
Select the color you want to edit and use the chromatic circle and the luminosity fader to custom your color.
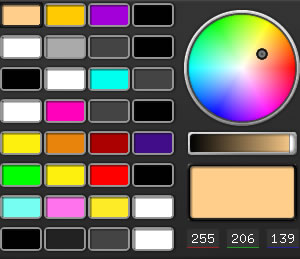
You can use the « fade » button and knob to add a fade effect from Black to White.

– 100 : black
0 : normal
100 : white
This feature can be use to make a blackout or some white flash !
If your hardware as a soundcard, you can plug in directly to Bazik. If not, use your internal mic. Remember that Bazik don’t need high quality audio.
With Syphon (OSX) or Spout (Windows) you can get Bazik output into your software. If needed you can use a Quartz composition as a bridge (perfect for Arkaos Grand Vj for example).
You can add shader files (.frag).
Simply drag and drop them in the Presets panel.
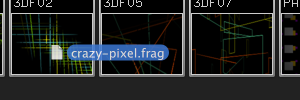
When it is done, you can use the Snapshot button to update the new preset look. Snapshot gets output render to create a thumbnail.
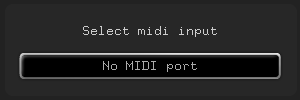
In order for your controller to interact with BAZIK, you need to connect and select from the list of options panel and create your Midi mapping. It’s really quick and easy !
1. Launch BAZIK
2. Connect your controller and power it up.
3. Open the Options panel and select your controller in the Midi input list.
4. Open the Controls panel and click on « midi learn ».
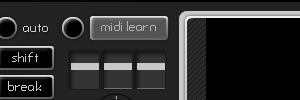
5. Each Midi assignable button appears blue. Simply rollover one and touch your Midi device. When the button turns green, the device control is registered.
To cancel, simply click the button, and it becomes blue.
1. Be sure your Midi controller is connected and power up.
2. Select your controller from the Midi input list. Be careful, some have several MIDI channels, try each of them.
3. If your controller is ready, you should see some activity in the indicator (blinking) to the left of the “MIDI LEARN” button.
4. Remember whilst Bazik works on MIDI, as with all applications it will function differently depending on the quality and precision of your device.
Support, FAQ, tutorials is updated permanently.
If there are any questions or suggestions, please contact us !
Contact